
|
Fitting the Canopy |
September 6, 2012
On to the canopy frame and canopy. I have read about this process for a long time, so when I arrived here it was with a bit of trepidation. However, these are just plastic and metal parts; nothing mysterious about how they work.
First off, I drilled the aft frame slide so it had the specified clearance from the slider rail. Not much clearance; just enough. I can't recall exactly, but I think I was using the .009" feeler gauge.
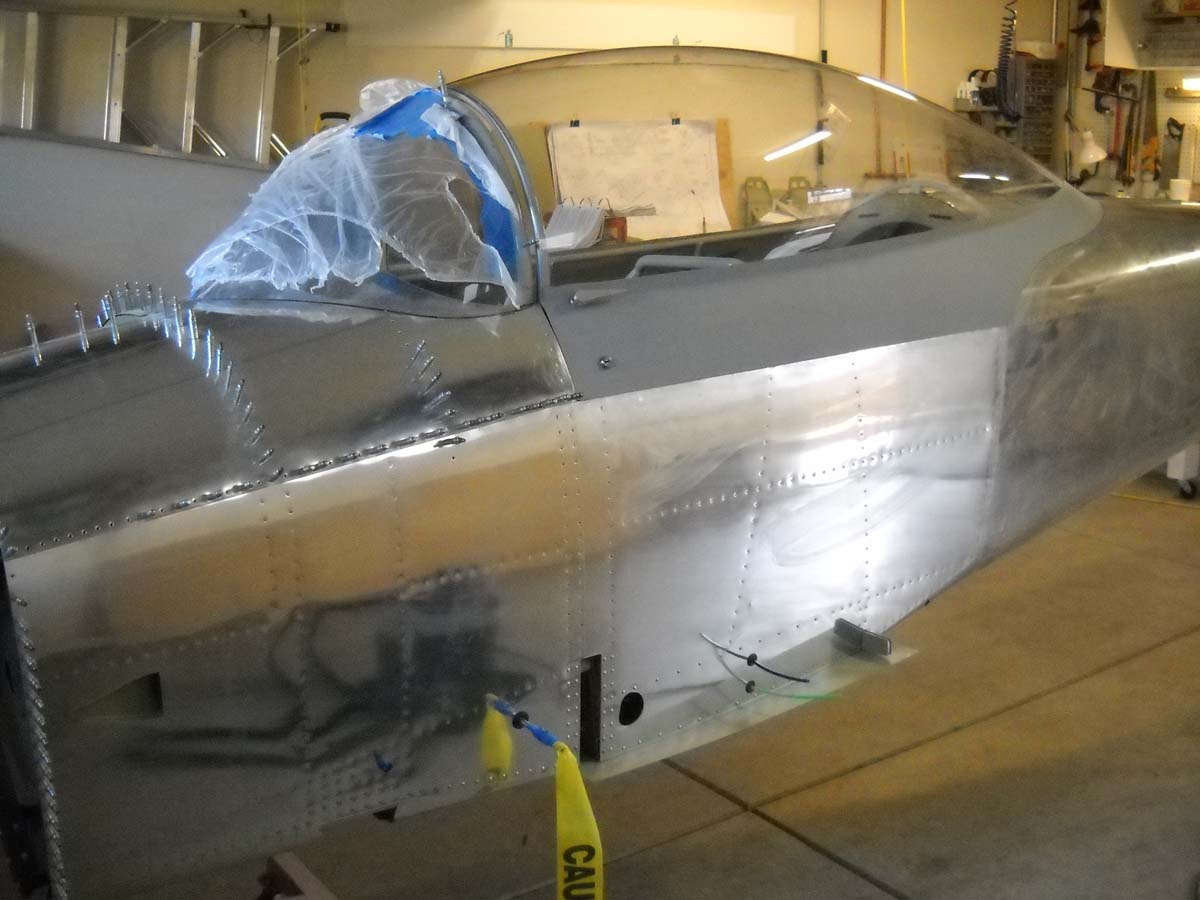
Here is the frame on the fuselage being adjusted to the proper shape. The idea is for the curve of the frame to smoothly transition to the side of the fuselage so that it neither extends beyond the fuselage or falls short. Scrap aluminum is used to check the fit. Getting close here.

Of course, making adjustments can be problematic. This stuff likes where it starts from, so simple muscle power does not seem to be enough to effect a needed change. I followed others by using cargo straps to pull the frame together enough to make the needed adjustments after the strap is released.

It was a slow process, with the canopy frame off and on multiple times, each time with little or no apparent change despite my efforts. Slowly, however, the frame agreed with me and came to where it really wanted to go.

Not without exacting a bit of flesh from me, though. Not a pound, but a bit. When one releases the cargo strap to release the canopy frame, it snaps back at you. I cut my right hand twice in a good manner in about five minutes. Good thing I'm left handed. So, blood, sweat, and a few tears (well, no tears yet but I haven't finished the canopy).

So, the canopy frame adjusted and mounted on the fuselage ready to receive the canopy.

Thus, from the storage facility (den) comes the canopy. I dropped it into position and started the evaluation process. This canopy, by the way, is a special order through Van's with the highest UV protection I could get. Between my spending a good deal of my time above 15,000 feet and my wife's sensitivity to the sun, I figured the extra protection was worth it. Should help the cockpit stay cooler and protect its innards, too.

Another view of the canopy. The first task is to cut the large excess flange off the canopy. I wanted to move on this cutting while the Sacramento summer lingers and the ambient temperature remains above 90 degrees. Last weekend, mother nature did cooperate.

So, here is the canopy cooking in the sun, just awaiting me, my die grinder, and my Van's supplied cutting disks. Took my first few tentative test cuts and then went wild.

So, the process moved forward. The flange came off and then I started making progressive cuts, primarily at the front and the back of the canopy, to bring the whole assembly down on the canopy roll bar. Here we are with quite a bit to go. It took a bit to figure out what shape the canopy-fuselage union should be. Each cut needed to be sanded and smoothed before proceeding.

But I did get there. When the canopy was sitting down on the roll bar and pretty close at the front and back, I laid out the cut to separate the canopy from the windscreen. Lots of way to do this but I just followed the plans with a cardboard template to mark the cut, then used masking tape to help lead the way.

So then I cut it, with the help of my son Lucas as a second set of hands.

Here it is with the windscreen pulled off. Not the straightest cut nor the neatest, but with a bit of sandpaper and patience it too will come around.

So, I was then a bit pressed for time due to a recalcitrant radiator that my son and I were working on. I had hoped to finish trimming the sides and then doing a good job of sanding before setting it aside for a week. However, I had to be content with doing a whole lot of sanding on the canopy-windscreen joints and then with just making sure the rest of the cut surfaces were sufficiently sanded for me to let them be for a week.
As a closer, I found a small crack near the extreme forward lower corner. It was small but I decided to stop drill it right now, which I did. It may get trimmed away when I trim the sides later; maybe not. But it will be hidden by the skirt and as long as it remains just as it is, will be benign. Good reminder to use due care on this canopy.
At this point, I plan on following the Van's plans and rivet the canopy to the frame. Using adhesive to join the canopy to the frame is becoming more popular, but thousands of those who have gone before have use the plans and rivets without problems as long as the prep work is good. So, I ordered a couple of Plexiglas drills from Aircraft Spruce. Used in conjunction with a step drill, countersink, and some fine sanding and polishing, I hope to have a stress free canopy and pilot. I plan to use the 1/4" rivet holes with 1/4" OD, 1/8" ID, surgical tubing based spacers to allow thermal changes to the canopy with the 1/8" aluminum rivets. The rubber spacers are a bit of a deviation from the plans, but not too radical. We shall see where I am in a few weeks on this thinking. So, next drilling and then my pink skirts. I get to try on my pink skirts.
September 24, 2012
Continued work on the canopy and canopy skirt over the past several weeks. Slow progress but it is coming together.
Here is the canopy clamped to the frame and getting ready to drill. I followed the official instructions on the drilling, that is, using a #40 regular bit to drill the initial hole through the plastic into the frame. Then, the hole is enlarged to something like a #27, the instructions calling for the use of a plexiglas bit. I decided to instead use a step drill to enlarge the holes, which in the end worked out pretty well.

A closer view of the clamping with some of the initial holes drilled. One thing I wish I had done differently is to leave a bit more plastic below the level of the frame to increase hole to edge distance.

Here is the canopy back on the fuselage with most of the plexiglas holes drilled.

A closer view of the drilling in progress. The cutout for the canopy handle shifted a bit through the fitting process.

As per the instructions, the lines were drawn to help locate the holes in the skirt. This process worked okay but was not exact.

Another view of the canopy ready to accept the skirts for initial fitting.

And the two pieces of the skirt laid out for trimming as per the instructions. Actually, the instructions say to trim within 1/4" of the molded scribe line; I went to 1/2" and was happy I did.

Here is the template I used to locate the holes the vertical sections of the frame. I used a hard plastic sheet; one sheet was enough to use as template for the three vertical sections on each side of the frame. Worked out okay when I transferred this to the skirt sections to locate the holes.

Here the skirts are taped into place while getting ready to start drilling the matching holes.

How the aft end of the skirts came together after the first trimming.

Here I am locating the matching holes in the right side skirt. The right side laid down well and I drilled those holes. Then I did the same to the left side, which did not lay down as well, but fit better at the base of canopy. I ended up going back and redrilling all the holes on the right side to make the fit at the base of the canopy match the left side.

I added some fiberglass filler on the left aft side to try and make the fit better but it made it worse. The added fiberglass added a bit of a warp to the fit that caused this section bulge out more than where I started from. A bit frustrating here and I decided to just cut this area out and replace it with new material. Removing the warping pressure did allow the skirt to lie flat here, but added to other problems.

Another view of the area removed.

A few sessions later with several layers of fiberglass lay up and then a bunch of filler with microbubbles. Still some trimming but here, at least, the skirt lay flat on the skin.

Another view of the skirts as they get closer to completion.

As I left the skirt fitting at the end of last weekend, this is how the aft end looked. It actually looks worse here that it does in person. I think the camera adds some fractional inches. But, there remain two areas, including each side of the aft end of the skirt, where I want to add some filler and effect a better fit.

A side view of the skirt, which is now one piece. Still some tweaking required here to make it all over better, but I think one or two more sessions will do it. I have enlarged most of the plexiglas holes to 1/4" and will use 1/4" OD, 1/8" ID rubber tubing to make little bushings for each hole in the plexiglas. Then, the skirts will be riveted to the frame through those canopy holes with the bushings.

As of right now, no cracks and I'm generally happy with the progress. I think the canopy will turn out in an acceptable manner for me.
For what it is worth, here are some things I wished I had done differently:
October 11, 2012
More work on the canopy. It is 95% there after this past weekend, almost ready for a coat of primer. I thought I could finish it before going out of town on my job but that last 5% makes a big difference between half-assed and not bad, so there we are.
After I sanded the whole thing down with increasingly finer grits of sandpaper, I tried the "coat it with a 50% epoxy/50% acetone mixture" to fill in the last pinholes and imperfections. Not really happy with that in the end; After sanding most of it off I still had some issues with some pinholes and other flaws. I did those areas with either a 100% epoxy mix, then squeegeed off with a burnt out credit card (worked well) or used a bit of Superfil on larger problems. I think this combination will work with one more sanding session and another close inspection before applying some primer. I want to install the cockpit latch and possibly the cockpit lock after priming. Then, it will be set aside for later. The primed area will be resanded later and primed again prior to final painting, but the pink will be gone for a while.
So, here is where I was at at the end of the weekend.

Not entirely happy with the aft end but I think it is acceptable. I might add a bit more filler to the area on each side of the slide but maybe not.

I had not trimmed the forward skins to meet the skirt until I neared completion and then decided it was okay to trim them. I had read varying ideas on this but if the skirts are allowed to overlap onto the top of the skins they catch on the edges when closing the canopy. Trimmed away and it works just fine now.

October 26, 2012
Well, the canopy is essentially finished. I did some clean up work on the skirts and then added two coats of high-fill prime with a sanding between the two. This primer will mostly be sanded away later when the airframe is primed for painting. After priming, the canopy handle and lock were added. Fini. I would imagine a bit more work will be needed, but it is now on to the next thing. So here is the final result before removing the canopy for storage.
Inside view of the latching mechanism. Pretty clever design, actually, as it affords an overcenter when latched to the roll bar. I took caution that the latch does not exert pressure pulling the left side of the canopy closed. This apparently tends to warp the frame a bit and might promote plexiglas cracking.

I had tried a hardware store cabinet lock for the baggage door but was not happy, so went ahead and ordered the standard lock set from Aircraft Spruce. A bit pricy (and only one key??!!) but it worked much better for this application, with one lock cylinder for the canopy and the second for the baggage door.

I looked at different options for mounting the lock, but chose the simplest (to me, anyways) with a hole here on the skirt and a small slot "dremeled" into the canopy rail. Simple and effective.

Here is the fuselage pretty much externally complete. The windscreen is drilled and ready for mounting but, of course, the forward upper skins still need to be riveted on. I will do that after as much wiring and plumbing done as possible. Looks pretty good. After this view, the canopy came off so I could resume work on said wiring and plumbing.

And, here is the canopy in the canopy storage repository facility (CSRF) where it will remain until it is time for the final painting. Actually, when I glass up the windscreen, it will make a brief reappearance for fitting.
